Uploading Folders
This page applies for Folderize version 5.3+. If you are using v. 5.2, see Uploading Folders (v. 5.2). To see your current version number, in Folderize go to Menu | Admin Tools.
For basic information about Replicator for Folderize 5.3+, including getting logged in, see The Replicator Utility.
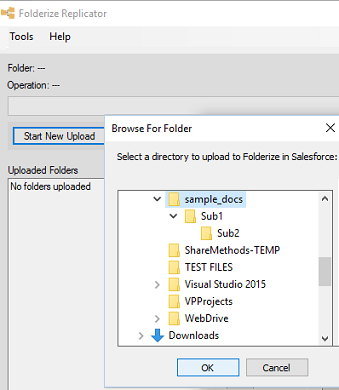
Folders you upload using Replicator may be on your pc, your intra-net file system, or even in a cloud storage resource. Basically, if you can use Windows File Explorer to browse to the server and see the folders and files you want to copy, then it should work. See last section below about SharePoint.
Default sharing of uploaded content:
- Uploaded folders are visible to all users unless you have set folder sharing rules.
- Sharing of the uploaded documents are set according to whatever strategy you selected on the Document Permissions help page.
Settings
Below is a view of the Replicator upload module settings panel. You may leave all settings at default, or change them according to the guidelines shown in the app. The setting Publish files to Library is relevant only if you have selected to use libraries as part of your document permission strategy.
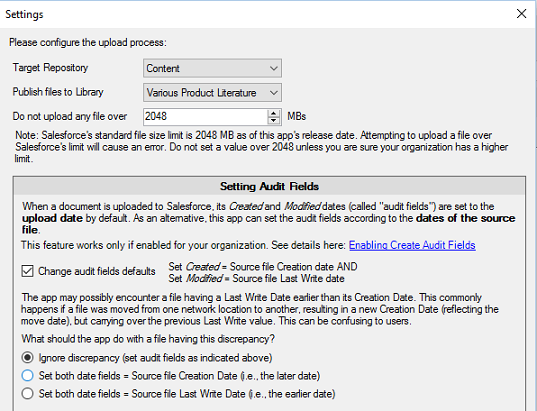
You can update settings just for the current session by clicking the Apply Only To This Instance. In this case, your changes will be reset after closing the upload manager window. Or if you click the Save button, the changes will apply to each newly opened upload session.
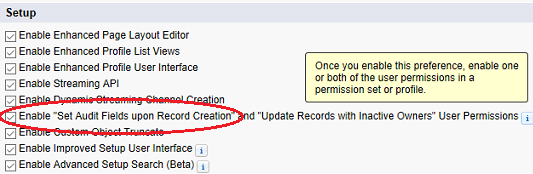
To turn on the setting Change Audit Fields Defaults (explained in the Replicator Settings pane shown above), two permissions must be enabled in your Salesforce org:
- Customize | User Interface | Setup | Enable “Set Audit Fields upon Record Creation”.
- Then in the user’s Profile or Permission Set: Administrative Permissions | Set Audit Fields upon Record Creation.
Libraries available in Replicator Settings include only those where the user has author permission (action Add Content in Classic: Setup | Content Permissions). Note that a user with default Administrator permission in the library does not have this — see note about library permissions in Admin Tools.
Permissions Needed by Replicator for Uploads
To start an upload process, a Salesforce user must have all of these:
- Permissions to upload: Create Files, Create Folderize Folders, Create SmDocumentFolders.
- Permissions to roll back upload results: Delete Files, Delete Folderize Folders.
If the user does not have the permissions above, the admin should grant them via one of these permission sets included in the package:
- SMF Documents and Folders Manager
- SMF Full Access
Limitations and Work-Arounds
Certain features of the Microsoft Windows operating system place a limit on the ability to upload deep folder structures. But if you encounter this situation, there are work-arounds as follows.
The main problem you might encounter is that Windows does not handle folder paths in excess of 248 characters. An example of a “path” is
C:\MyFiles\foldername1\subfolder1\subfolder2\subfolder3\subfolder4...During an upload, when Folderize gets to a folder having a path greater than 248 characters, the upload will stop and you will see an error message directing you to review the event log (right side panel of Replicator). In the event log there will be an event recorded similar to the following.
[ERROR]: The specified path, file name, or both, are too long. The fully qualified file name must be less than 260 characters, and the directory name must be less than 248 characters.
Work-around 1: When you encounter the error, abort the Replicator program, keeping the already uploaded folders. Copy the subfolder or branch which did not get uploaded to a temporary location on your pc. For example:
C:\MyTempStuff\subfolder10\subfolder11...The copied branch may have multiple levels as long as no level reaches the limit of 248 characters. Now upload the copied branch. Initially it will become a top folder in Folderize. Then on the Folderize page, just drag it to the appropriate location in your hierarchy. If you have a complicated structure, you may need to do this for multiple branches.
Work-around 2: This is a variation on the previous work-around. When you encounter the error, cancel & rollback the upload. Make a copy of your full source structure, then delete sub-folders having too-long paths. Upload the remaining folders. Then upload the deleted sub-folders separately as above, and use drag-and-drop on the Folderize page to move them to one of the folders uploaded in the first step.
Work-Around 3: If your long paths are caused by long folder names (as opposed to too many levels), consider shortening the names. For example:
C:\MyFiles\Sales-And-Marketing-Brochures-And-Documentation\Sales-And-Marketing-Brochures...In this case, consider renaming the folders more concisely, for example:
C:\MyFiles\Sales-MarketingBrochures\...
Work-around 4: This approach avoids copying your structure. Instead, temporarily “mount” a folder to a virtual disk/drive. You can use this approach in conjunction with one of the above work-arounds. Suppose you have the path
C:\MyFiles\long folder name1\long folder name 2\subfolder1....and you want to upload “long folder name 2”. Proceed as follows.
- Open the command line console (Win + R and type cmd)
- Type [SUBST /?] to get help article
- Find a free letter for your virtual drive (“X” for example) and type the command
[SUBST X: “C:\MyFiles\long folder name1”]
(Use brackets and quotes as shown.) - The new “virtual disk” will appear in “My computer” or “This computer” in Windows Explorer, and you will be able to choose it in the Replicator. As a result, the path to your folder gets shorter — it now starts X: instead of C:\MyFiles\long folder name1
- The new disk will be automatically deleted after next restart of OS, but you can use [SUBST X: /D] to remove it immediately.
Uploading From SharePoint
Uploading from SharePoint is accomplished with the Folderize Replicator (described in previous sections).
To upload folders from SharePoint, they must be “mounted” or “mapped” as a “logical drive”. This makes SharePoint folders viewable as if they were file system folders. That already may have been set up on your network. If you can browse to the desired SharePoint folders via Windows File Explorer, you can proceed as per the guidelines in the previous sections. This approach also will work with SharePoint Online.
If you need to set up a drive for a SharePoint library, the typical way to do it is:
- Windows 11: In File Explorer, in the left panel, right click This PC then Add a network location, and follow the prompts.
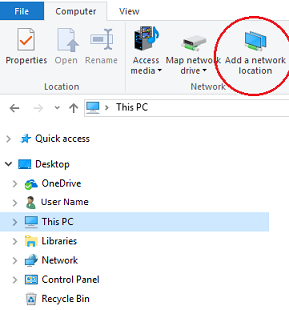
- Windows 10: In File Explorer, in the left panel, select This PC, then in the Computer tab at top, select Add a network location, and follow the prompts.
- Windows 7: Start > Computer > Map Network Drive, select a drive letter, then enter the network location.
If that doesn’t solve it, you may need to see if your SharePoint system has a help page about how to do that. Depending on the SharePoint version, the instructions to do this are different. If you need our help with that, please tell us which SharePoint version you have.
Note that your SharePoint library may list “files” that actually are Windows shortcuts pointing to a document stored in another location. But that same library, viewed via mapped drive or Replicator, may not show the shortcuts, but only files that are actually stored in the selected location.