Roll-Up Files To Parent Object
Overview
Some Salesforce objects have parent-child relationships. For example, in the Account-Opportunity relationship, Account is the parent and Opportunity is the child.
In Folderize, when you add a file to a child record such as an Opportunity, by default it is visible only there, not on the parent Account page. But it is possible to change this behavior so that files added to a child automatically “roll up” to be seen on the parent record as well, in the same folders. (Files are not duplicated in the roll-up; the original files just are seen in an additional location.)
Below we first provide instructions to configure an Opportunity-to-Account roll-up, the most common relationship where this is needed. Following that are instructions to adapt the functionality for any parent-child relationship (which may involve custom objects).
Opportunity-To-Account Roll-Up
We assume here that you have configured (or will) object-record mode for both the Account and Opportunity objects.
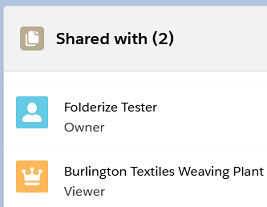
When you add a file to an Opportunity folder, technically the file gets “shared” with the Opportunity record. This is reflected in the sharing info on the file details page, as in the accompanying illustration. Salesforce treats the Opportunity “Burlington…” as a “viewer” of the file.
To make the file appear on the parent Account’s Folderize view, it needs to be shared with the Account similarly. You make this happen automatically with an Apex trigger created according the instructions below. You do not need to know Apex coding to implement this; the needed scripts are provided.
With the trigger in effect, any file uploaded to any Opportunity will be shared with its parent Account. Thus in each Account’s Folderize view, you will see documents of all its Opportunities (along with any files added directly to the Account).
The trigger will not update files added to Salesforce before the trigger was put in effect. Those can be handled manually per the following highlighted section. (Or if you have many such files, ShareMethods could create a batch job to accomplish it, as a special project.)
![]() If you only need to roll-up some, not all, Opportunity files, it is possible to do so manually instead of using automatic roll-up. After a file is uploaded to an Opportunity, just go to the parent Account, click the desired folder, and use Folderize menu option Manage Documents | Add From Salesforce.
If you only need to roll-up some, not all, Opportunity files, it is possible to do so manually instead of using automatic roll-up. After a file is uploaded to an Opportunity, just go to the parent Account, click the desired folder, and use Folderize menu option Manage Documents | Add From Salesforce.
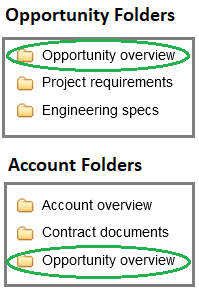
If you turned on Set Folders For Objects as part of object-record mode setup, note the following (otherwise, skip this paragraph). You perhaps gave the two objects different folders, as in the illustration. In that case, we assume your Account object uses at least some of the same folders as Opportunity! Even if a file is shared with a parent, the file won’t roll up to the parent’s Folderize view, if the file’s folder is not used by the parent! In the illustration, files uploaded to Opportunity folder Opportunity Overview will appear for the Account, but not files in Project Requirements or Engineering Specs. (But all Opportunity files will appear in the Account’s Files related list — which you may want to hide! — because the roll-up script shares them all with the Account.)
The roll-up solution requires copying three text files containing Apex code. Here is a brief description of the files. But if you are not a developer, you don’t need to know what any of this means!
- Folderize_ChildToParentDocSharingUtils: Apex class with utilities for the trigger;
- Folderize_CdlBgJobs: The trigger itself, on the ContentDocumentLink object;
- Folderize_UT_CdlBgJobs: Apex class that covers the functionality by Unit tests.
Here are setup instructions. To copy text where indicated, open the file in a simple text editor such as Windows Notepad; word processors tend to add formatting which may cause the file to be misread (evidenced by error messages in developer console).
- Open Salesforce Developer Console. If not available, an administrator needs to enable the system setting Customize Application for you. Also you may need to go to Settings | My Personal Information | Advanced User Detail then enable Development Mode, Show View State in Development Mode.
- Click File | New | Apex Class. Enter this class name:
Folderize_ChildToParentDocSharingUtils
Create the class, delete its default content, and replace with code copied from this file: Folderize_ChildToParentDocSharingUtils.txt. Save the changes (File | Save).
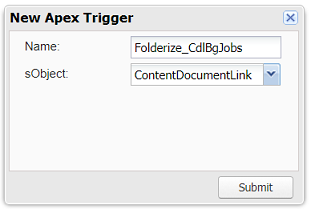
- Click File | New | Apex Trigger. Enter as name of trigger:
Folderize_CdlBgJobs
In the sObject drop-down list, select ContentDocumentLink, and submit the form.
Delete the default content of the trigger and replace with code copied from this file and save: Folderize_CdlBgJobs.txt
- Click File | New | Apex Class. Enter this class name:
Folderize_UT_CdlBgJobs
Create the class and replace its default content with code copied from this text file and save:
Folderize_UT_CdlBgJobs.txt
- Your trigger should now be working. Try it by uploading a file to Folderize on a child object record!
Roll-Up Other Objects
The instructions above are easily adapted to any parent-child object relationship. You just need to modify a few lines of code in the text files, as specified below. It is recommended to make the changes in a simple text editor such as Windows Notepad; word processors tend to add formatting which may cause the file to be misread.
- Modify the text file of step 2 above:
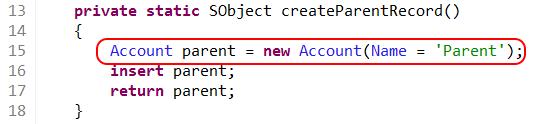
- In line 12: Replace “Opportunity” with the API name of your child object.
- In line 13: Replace “Opportunity.AccountId” with the child object API name followed by dot then its field that stores a reference to the parent.
- The screenshot below shows these lines as they would be seen in a developer’s text editor.

- With these changes to the text, copy and save it as per step 2 instructions above.
- Step 3 is unchanged; follow those directions as given above.
- Modify the text file of step 4 above:
- In line 15: Replace both occurrences of “Account” with the API name of your parent object.
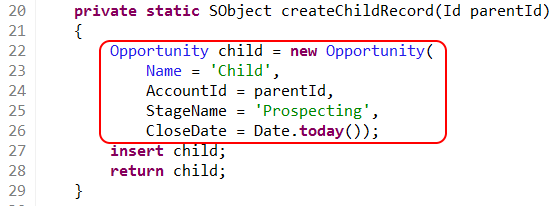
- In lines 22-26 of the step 4 text:
- Line 22: Replace both Occurrences of “Opportunity” with the API name of your child object.
- Line 24: Replace “AccountId” with the field that stores a reference to the parent.
- Line 25-26: Delete up to and including “today()”, retaining the single close parentheses and semicolon at the end of line 26. These two lines populate required fields in an Opportunity. For any required fields in your child object, substitute the equivalent. (This is for unit testing; the data is not entered into your actual records.)
- With these changes to the text, copy and save it as per step 4 instructions above. You are done.