Profile Settings
Use Permission Sets or Profiles?
The simplest way to manage Folderize access is with the permission sets included in the app package. See the App Permissions page about that.
If you use permission sets as recommended above, you would not need to deal with the settings below, and you should ignore the rest of this page.
On the other hand, if you first installed Folderize before we added permission sets to the app (v. 4.0, June 2017), you would have assigned permissions via profiles. In that case, directions to manage profile settings are found below. But we recommend instead, switching entirely to permission sets to manage app permissions. Do that by first going to the App Permissions page and making the assignments described there. Then return to this page and disable all Folderize profile permissions described below.
To follow the instructions below (in Salesforce Enterprise Edition and higher), user profiles should be custom. Folderize cannot be enabled for most default profiles (except in Professional Edition). If you are using default profiles, and want to install for “all users”, it is suggested that you clone those profiles to custom, and assign users to the corresponding new custom profile, before installing Folderize. Alternately, you can clone them after installing and then proceed as below.
Access to the Folderize Tab
On installation, if you selected “Grant access to all users”, Folderize will appear initially on each user’s “All tabs” page. Add the Folderize tab (not “Folders”) to your desired apps via Setup | Create | Apps. These users will have full access to all features by default. Restrict the permissions, if needed, by steps further down in this page.
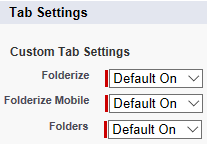
If you selected “Grant access to admins only” on installation (Salesforce Enterprise Edition or higher), the first step in granting user access are the tab settings. In general, you should turn on all three tabs shown here. If you have renamed the tabs, they will appear under their new names.
- Folderize
- Folderize Mobile
- Folders
Then add Folderize to apps as above. Also review the tabs information on the About Tabs page.
Additional steps in granting access are in different sections below, depending on what level of privileges you want to give.
If Salesforce does not allow you to make the changes below (options not clickable), then you likely are using a default profile. The solution is to clone that into a custom profile, make the changes there, then assign those users to the new profile.

The screen shots below are from the “original” profile user interface. In other words, this setting is disabled: Setup | Customize | User Interface | “Enable Enhanced Profile User Interface”. If you are using the enhanced profile interface, the settings will not be seen in the same arrangement shown here, but you will find the same choices available.
Folderize Permissions vs. Files Permissions
The settings on this page do not control which documents or folders a user sees. This page has to do with access to Folderize features and controls. Document permissions are determined by one or more of these Salesforce sharing settings:
- File sharing, if document stored in owner’s “Private Library” (private files).
- Library sharing, if document published to a shared Library.
- Folder sharing, if that capability is enabled (and the Folderize setting Documents inherit folder sharing is on).
- Object sharing, if you are using Folderize object-record view (documents inherit record sharing).
(Also see the discussion of folder and document permissions on the Permissions Overview page .)
In addition to the settings below, users who will manage documents also need Salesforce system permission API Enabled in order for drag-and-drop upload to work.
If you enable the settings below and a user can see folders, but does not see the expected documents in those folders, these are possible causes.
- The user may need CRM Content enabled. See the prerequisites page about that.
- The user may need to be added as a member of one or more Libraries that contain the documents.
- Or documents (if not in a library) may not yet be shared with the user.
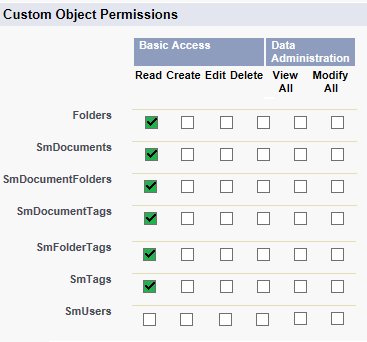
Read-Only Permissions
On installation, if you selected “Grant access to all users”, Folderize by default will allow any user to take these actions:
- Add, delete, or rename folders.
- Move folders (by drag-and-drop).
- Add or modify folder tags.
- Add documents to folder.
- Remove document from folder (gear icon).
- Use the Admin Tools page.
To disallow all these privileges, the custom object and Visualforce settings shown below effectively convert the Profile to “read-only” status for Folderize. (But read again the section above about Folderize permissions vs files permissions.)

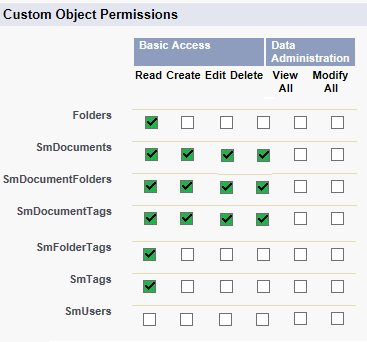
Disallow Folder Management but Allow Adding Documents
You may want users to add documents to folders (or remove documents), but not make changes to the folder structure or folder properties. The Custom Object and Page settings to accomplish this are shown in the following illustrations.

Allow Folder Management and Adding Documents
This set of configurations allows the user to take all actions, except does not provide access to the Admin Tools page. The users may add/edit/delete folders and add/remove documents.
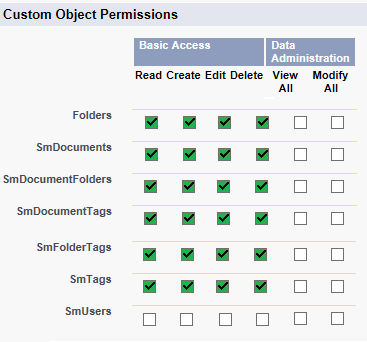
Grant Full Permissions
To grant users full Folderize access including adminstration, enable all the Visualforce pages and grant custom object permissions according to the accompanying illustrations.
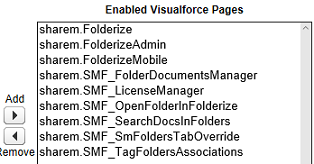
Fully Disable Folderize for Selected Users
To withdraw users’ access to Folderize (Enterprise Edition): For that Profile, go to Visualforce Page Access settings and disable all pages whose Namespace Prefix is sharem (or whose AppExchange package name is Folderize).
This is an unlikely situation: If you disable CRM Content but leave Folderize enabled for a user, the user still will see Content documents listed in Folderize (because the Salesforce API continues to make those links available to the user in that situation).