Link Records To Folders
This page describes an alternative to Folderize “object-record mode”. Depending on your needs, this is possibly a simpler way to link folders to objects such as accounts or opportunities.
Background
For this approach, a typical use case is if you import an archive of documents related to your records. For example, you may have a document collection on a server, with a folder structure similar to this:
- Customer 1
- proposals
- contracts
- Customer 2
- requirements
- schematics
- etc.
A collection having such a structure is easily imported into Folderize using Replicator. However, the import process does not automatically link the folder called “Customer 1” to its account record. The archive appears initially as a stand-alone collection in what we call the Folderize main page, unrelated to the Account object.
How do you connect these folders to their accounts (or to any object)? There are two main ways:
- Link to the folders. This may be the easier approach from an admin’s point of view. Instructions to do this are below on this page. An overview of how this works:
- Leave the folders in whatever structure you have already established, such as in the example above. (Each customer or top-level folder may have different subfolders.)
- Add to the object a custom field that will hold, for each record, a link to the corresponding folder. For example, on the account page for Customer 1, set its value to the folder named “Customer 1”. The link will take you to the Folderize main page with that folder pre-selected and its documents and subfolders displayed.
- Note that sharing of the linked documents is not inherited from the record. Instead, sharing is determined by settings described in Document Permissions.
- Or use Folderize object-record mode. This is not the technique described on this page, but is mentioned here to provide a complete understanding of the alternatives. To accomplish this you would need to perform these steps:
- Set up object-record mode and create a new universal folder structure common to all records of the object. (Thus each customer or record must have the same folders, unlike the example above.)
- To associate previously imported files to their records: Write an Apex script to “share” each document with the appropriate record and folder; OR manually for each record, add each needed document to the appropriate folder, using Folderize menu option Manage Documents | Add From Salesforce.
- By this method, document sharing is inherited from the record.
Configure the Custom Field
Here is the procedure to set up links to folders as outlined above. Instructions are given for the Account object, but the same approach is applicable to any standard or custom object.
Start by going to the Fields page for your object in Salesforce Setup:
- Lightning: Objects and Fields | Objects Manager | Account | Fields & Relationships.
- Classic: Customize | Accounts | Fields.
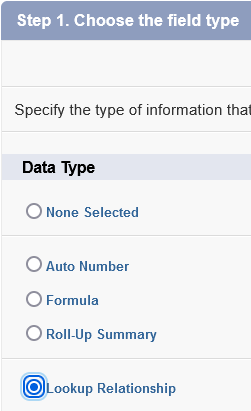
1. Click New and choose Lookup Relationship field type, then Next.
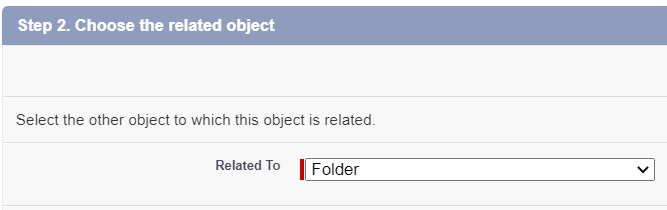
2. In the Related To pull-down list, select the Folder object, then Next.
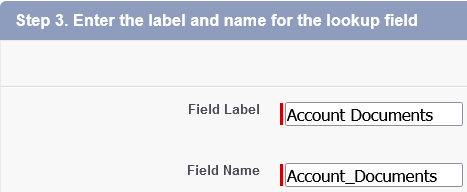
3. Enter field label and name, for example, “Account Documents” or “Account Documents Folder”, then Next.
4. Configure field-level security for the new field. You may, for example, want to make the field read-only for some profiles. Then Next.
5. Add your new field on the desired page layouts, then Next.
6. Uncheck the Add Related List checkbox. Save.
The new field will appear, initially blank, in the Details section of your account records. (Reposition it as desired in your layout editor.)
Using the new field

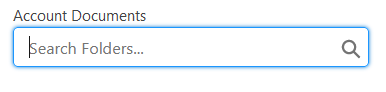
After setting up the new field: For each record, enter the appropriate Folderize folder name. It will turn into a link automatically.
In Salesforce Lightning and Classic, clicking the link will take the user to the Folderize page, with that folder selected in the left pane; its documents displayed in the right pane; and subfolders in view (assuming admin setting Expand Folders Automatically is on). In mobile, the link will go to the Folderize Mobile top level, and the user will need to scroll or browse to the desired folder.
You are not required to link to a top-level folder; it may be any subfolder as desired. You could even create multiple lookup fields in order to link to different folders or subfolders.
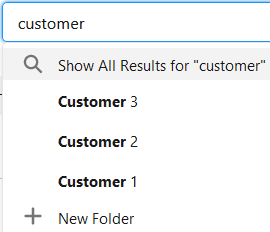
Within the field input box, the “Search Folders” feature provides a list to select from, if needed.
Although the Salesforce input box offers an option here to create a new folder, Folderize does not accept database changes from this location, so trying to do so will return an error message (as of v.4.15). Instead, create folders if needed via Menu | Manage Folders of the Folderize tab. (If you are using an earlier version, it is possible to create a folder here, but we strongly advise not to do so. If you enter invalid data, a folder will appear to get created, but it will be deleted at a later date by a clean-up process.)