Community: Configure File Sharing
This page describes how to share internal Salesforce Files with external users (community members). By internal files, we mean files created by users (usually employees) in the main Salesforce environment, or in the environment not related to communities.
Contents
Inherit Folder Sharing
Folderize provides the Documents Inherit Folder Sharing setting on the Admin page. When it’s enabled, files in a folder inherit sharing settings from this folder, i.e.:
- if a user can see a folder, he can read all files within it;
- if a user can edit a folder, he can edit all files within it.
NOTE: this feature considers only direct mappings between folders and files. Files appearing by tag association are ignored.
This setting is the best choice for you if all the conditions below are true for your organization:
- You granted external users selective access to folders.
Note that if you give access to all folders (“Public Read Only” or “Public Read/Write”), this feature will make all files added to Folderize folders visible to your community. - All files in the shared folders must always be available to these users.
Note that if folders are also used by internal users and they add private or internal files to these folders, then the feature will cause data leaks.
Share via CRM Content Library
This is an easy way to share files with your community users. But this feature is available only to external users with these Salesforce licenses:
- Customer Community Plus;
- Partner Community.
If your community users have other licenses, e.g., “Customer Community”, skip this section.
Follow these steps to share files via a library:
- CREATE A NEW LIBRARY:
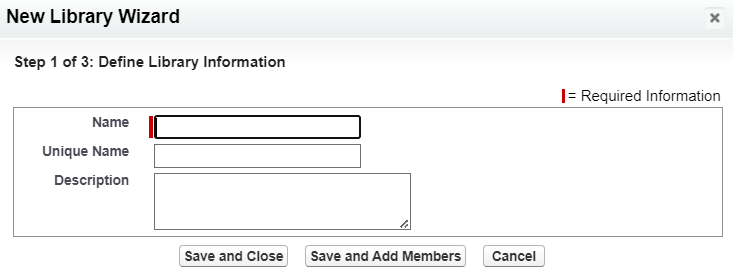
- Classic UI:
- Find and open the Libraries tab;
- Click New in the My Libraries list:
- Enter name (label), unique name (developer name) and description;
- Click Save and Close.
- LEX UI:
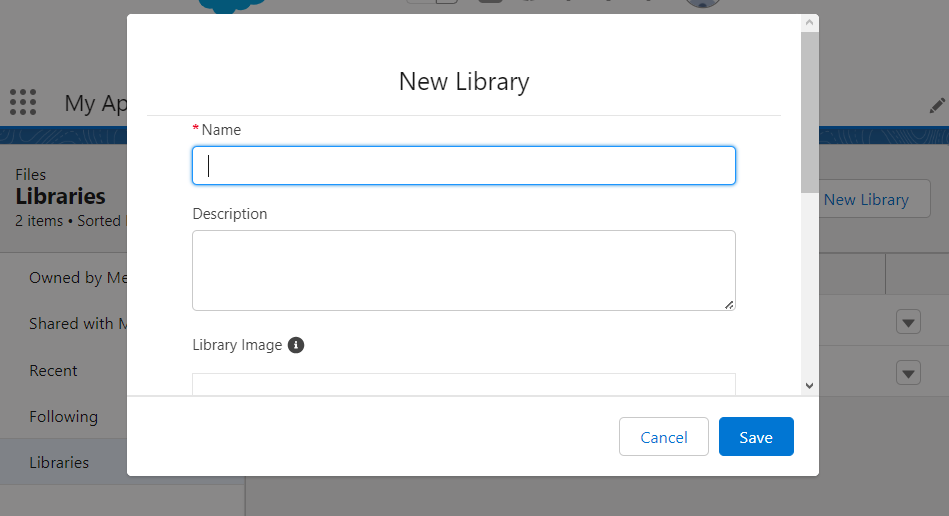
- Find and open the Files tab;
- Select Libraries in the left panel;
- Click New Library in the top-right corner:
- Enter name (label) and description;
- Click Save.
- ADD MEMBERS TO LIBRARY:
- Classic UI:
- Find the library on the Libraries tab and open its details;
- Find the Members list on the page and click Add Members button;
- You can then find and select individual users or user groups. It’s easier to add a group of users in the library one time and then manage members of this group:

- Click add;
- Click Next;
- Select user/group role in the library. Note that you can create custom roles in Setup | Customize | Salesforce Files | Content Permissions.
- Click Save.

- LEX UI:
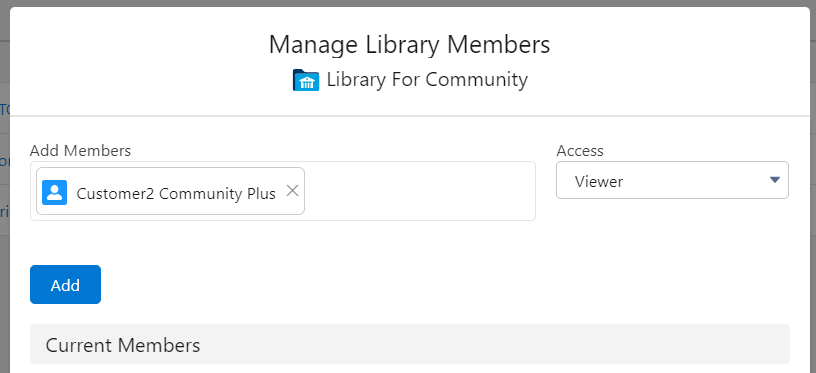
- Open the Files tab, select Libraries in the left panel;
- Find the library and click it;
- Click Manage Members in the top-right corner;
- You can then find and select individual users or user groups. It’s easier to manage groups:
- Click Add – users/groups will appear in the list of current members;
- Close the popup.
NOTE: you may notice the LEX UI lets you add users having licenses that do not support CRM libraries, for example the “Customer Community” license. This will not have any effect and these users still will not have access to files in this library.
- ADD EXISTING FILES TO LIBRARY:
NOTE #1: You can add a file to the library, if your library role provides Add Content permission (manage roles here: Setup | Customize | Salesforce Files | Content Permissions).
NOTE #2: Once a file is published to a library, its permissions will be controlled by this library and this action cannot be rolled back.
- Folderize Classic UI:
- Make sure the Enable Sharing Documents With Libraries setting on the Folderize Admin page is ON;
- Open Folderize;
- Select file(s) in a folder;
- Click Menu | Manage Documents | Share With…;
- In the opened popup, switch to the Libraries tab;
- Start typing name of the library, then select it;
- Click Share;
- Review the results and close the popup.
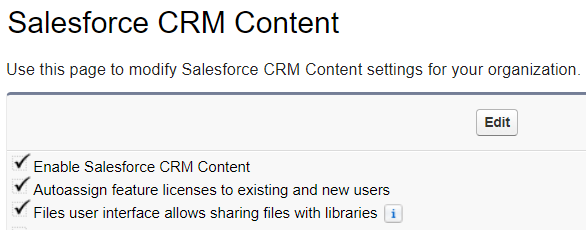
- Classic UI:
- Make sure that the Files user interface allows sharing files with libraries setting is enabled:
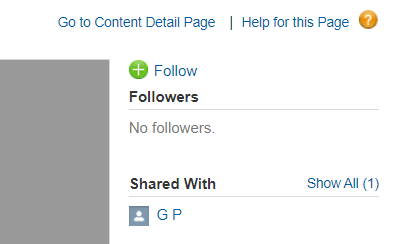
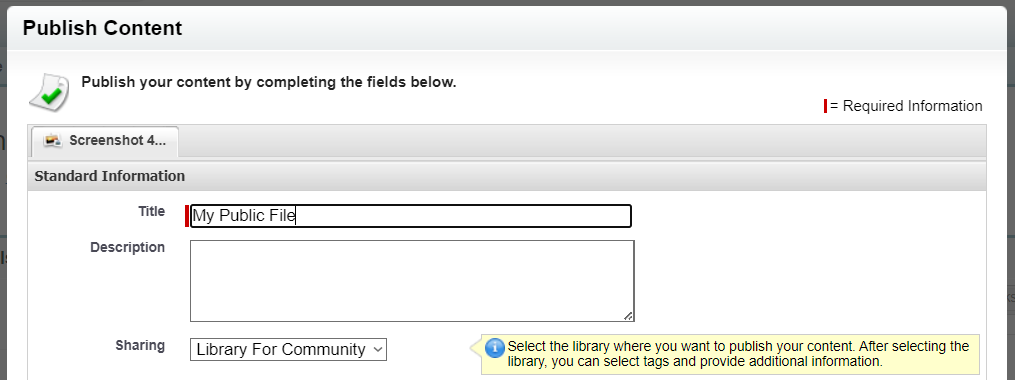
- Open file details, click Show All in the Shared With list OR
Go to content detail page and click the Publish to Library… button; - In the popup window, select the library in the Sharing field:
- Click Publish.
- LEX UI:
- Open the Files tab, select Libraries in the left panel;
- Find the library and click it;
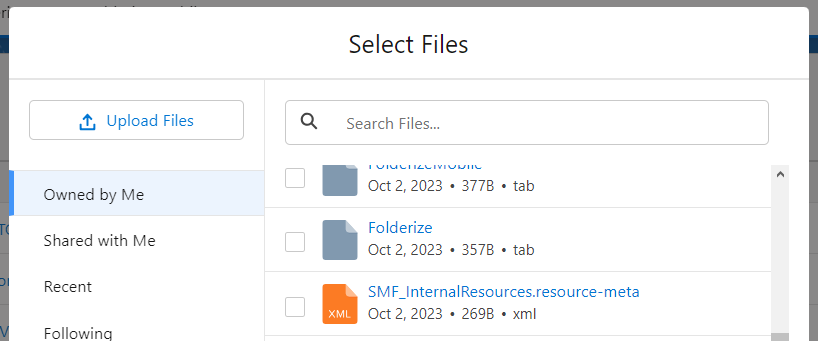
- Click Add Files in the top-right corner;
- Find file(s), that you want to add, and check them:
- Click Add.
Step 2 above “ADD MEMBERS TO LIBRARY” and step 3 “ADD EXISTING FILES TO LIBRARY” can be automated using APEX code according to your business logic. ShareMethods, publisher of Folderize, offers the option of a short consulting engagement to help set it up. If you might be interested in this, please submit the questionnaire.
APEX: Custom Sharing Model
Technically it’s possible to implement a custom model for sharing files with communities using an approach similar to one implemented in the Documents Inherit Folder Sharing feature.
The core idea behind this solution is to create a custom object, share records of this object with community via Sharing sets, and attach files to records of this object. As a result, if a community user has access to a record, he will also have access to all files attached to this record.
To do this, you need to:
- Create a custom object. You can call it “FileAccess”, “FileAccessControl”, “FileAccessContainer” etc;
- Create a lookup-field to Account in this object;
- Create a “Sharing Set” in Digital Experience settings to share records of this object with your community users.
You can find more details about configuring “Sharing Sets” in the “Partial Access – Sharing Sets” in the Community: Configure Folder Sharing. In that article, we talk about sharing Folderize folders with community, but technically Folder is also a custom object and all the scenarios described there are applicable to any custom object.
For example, you may make all “FileAccess” records available to all community members. Or you can share different sets of “FileAccess” records with different sets of members. - Select one these models of relationship between files and “FileAccess” records:
- 1-to-1 model. Each File, that needs to be shared with Community, has an individual “FileAccess” record. As a result, to share a file you need to create a “FileAccess” record and attach a file to it. To revoke access, you need to delete the “FileAccess” record.
Advantage: You control access to files more accurately (because of 1-to-1 connection between “FileAccess” and a file).
Disadvantage: You need to spend time to create a separate “FileAccess” record for each file. Also you have a lot of “FileAccess” records and they consume space in your database. - 1-to-many model. You have a few “FileAccess” records and each is re-used to share many files. You could even have just one record, but Salesforce limits the maximum number of files attached to a record to 2,000. So, if you need to share 10,000 files, you will not be able to attach all of them to one record, but you can simply create five records and attach 2,000 files to each one.
Advantage: You can group files together under different “FileAccess” records and, thus, control access to groups of files easier. Also “FileAccess” does NOT consume database space.
Disadvantage: You need to train your users and explain how this model works. Maybe it will be easier to implement APEX-based solution that takes care of sharing via this model!
- Fill the reference to Account in the “FileAccess” record according to your requirements (it should correspond to the Sharing Set created in step #2).
- Create “FileAccess” records and attach files to them.
We consider that this logic should be automated, but in theory, a business user can do these things manually.
Note that the Salesforce Classic UI does NOT provide a way to attach an existing file to a record.
Salesforce’s Lightning UI allows you to do this:- Open a record;
- Open the tab with related lists and scroll down to the Files list;
- Click Add Files;
- Select a file;
- Click Add;
- Find the file in the Files list and click it;
- Click Share;
- In the popup, expand Who Can Access;
- Find the “FileAccess” record in the list and switch the Customer Access toggle to ON:
- Click Done.

We consider that steps #4-6 should be automated to provide a clear and easy mechanism to business users. That is:
- “FileAccess” records should be created automatically according to the selected model;
- A reference to Account in “FileAccess” records should be filled automatically;
- A file should be attached to “FileAccess” record automatically. For example, you can define rules when a file should be shared automatically. Or you can create a Boolean field (e.g., “ShareWithCommunity__c”) in the File and the trigger that catches update of the field and shares or unshares the file automatically.
ShareMethods, publisher of Folderize, offers the option of a short consulting engagement to help set this up according to your needs. If you might be interested in this, please submit the questionnaire.